CSS
CSS
html:超文本标记语言 搭建网页
css:层叠样式表 美化网页
使用方式: 行内样式,与style属性配合使用,优先级最高
内嵌样式,一般在head中,用style标签包裹
外联样式,写在单独文件中,用link标签引入
内嵌和外联优先级取决于渲染的顺序
选择器的优先级从高到低:id选择器,class选择器,元素选择器
选择器: id选择器 class选择器 元素选择器 后代选择器 选择器分组 通用选择器
布局: div +css 布局 盒子模型 (内边距 padding 外边距 margin)
浮动 : float
定位: 相对 ,绝对,固定 通过调整 top left
一、CSS简介
1.1、是什么
Cascading Style sheets,层叠样式表
CSS可以用来为网页创建样式表,通过样式表可以对网页进行装饰。所谓层叠,可以将整个网页想象成一层一层的结构,层次高的将会覆盖层次低的,CSS可以分别为网页的各个层次设置样式。
1.2、能做什么
修饰美化html网页;
外部样式表可以提高代码复用性从而提高工作效率;
html内容与样式表现分离,便于后期维护。
1.2.1、为什么需要CSS
HTML标签属性
- 有些外观标签属性做不到,链接样式,行距等
- HTML标签属性不能实现代码和设计的分离
- 对于网站的整体风格设计会出现代码冗余
CSS样式
- 能实现HTML标签属性的所有功能 ,指的是外观
- 能实现代码和设计的分离,方便团队开发
- 适用于网站的整体风格设计
1.3、基础语法
不能独立使用,必须结合HTML使用
CSS规则由两个主要的部分构成:选择器,以及一条或多条声明
- 选择器通常是用来选择需要改变样式的HTML元素。
- 每条声明由一个属性和一个值组成。
/* 这是注释 */
选择器 {
      样式名称1: 样式值1;
      样式名称2: 样式值2;
}
注意事项:
- 请使用花括号来包围声明
- 多个声明之间使用分号";"分开
- css对大小不敏感,如果涉及到与html文档一起使用时,class与id名称对大小写敏感
二、CSS使用方式
2.1、行内样式 style属性
把CSS样式嵌入到html标签当中,类似属性的用法
<p style="color:blue; font-size:50px">This is my HTML page. </p>2.2、内嵌样式 style标签
在head标签中使用style标签引入CSS
<style type=“text/css”> //告诉浏览器使用css解析器去解析
	p {
		color:red;
		font-size:50px;
	}
</style>
2.3、外联样式 link 标签
将内嵌样式单独放到一个XXX.css文件中,HTML页面通过
**<link>**标签将.css文件引入到当前页面中link格式:
<link href="xxx.css文件路径" rel="stylesheet" type="text/css"/>用法同内嵌样式
/* css文件 */
p {
	color: blue;
}

#p2 {
	color: yellow;
}
html页面如下
<!DOCTYPE html>
<html>
	<head>
		<meta charset="UTF-8">
		<title>外联样式</title>
        <!--
			rel:代表当前页面与href所指定文档的关系
            type:文件类型,告诉浏览器使用css解析器去解析
            href:css文件地址
		-->
		<link rel="stylesheet" type="text/css" href="../css/test.css" />
	</head>
	<body>
		<p>外联样式演示1</p>
		<p id="p2">外联样式演示2</p>
	</body>
</html>
三、CSS选择器 重点
3.1、id选择器 重点
id选择器: 给需要修改样式的html元素添加id属性标识,在head中使用style标签引入在其中声明id选择器
格式:
#id值{属性:属性值}#选择
<style type="text/css">
    #s1 {color: red;font-size: 100px}
    #s2 {color: green;font-size: 100px}
    #s3 {color: blue;font-size: 100px}
</style>

<div id="s1">hello,everyone!</div>
<div id="s2">hello,everyone!</div>
<div id="s3">hello,everyone!</div>
每一个html标签都有一个id属性,按照规范一个id只能对应一个标签。
3.2、class选择器 重点
class选择器:给需要修改样式的html元素添加class属性标识,在head中使用style标签引入在其中声明class选择器
格式:.class名
<style type="text/css">
    .s1 {color: purple;font-size: 100px}
    .s2 {color: pink;font-size: 100px}
    .s3 {color: yellow;font-size: 100px}
</style>

<div class="s1">hello,everyone!</div>
<div class="s1">hello,everyone!</div>
<div class="s2">hello,everyone!</div>
<div class="s3">hello,everyone!</div>
每一个html标签都有一个class属性,同一类的标签设置成相同的class。
3.3、元素选择器 重点
元素选择器:在head中使用style标签引入在其中声明元素选择器
格式:html标签
<style type="text/css">
    p {color: red; border: 1px solid blue;}
</style>

<p>11111111111</p>
<p>22222222222</p>
以上选择器的优先级从高到低:id选择器,class选择器,元素选择器
3.4、属性选择器
根据元素的属性及属性值来选择元素。在head中使用style标签引入在其中声明
格式为:
htm标签[属性='属性值']{css属性:css属性值;}
html标签[属性]{css属性:css属性值;}
<style type="text/css">
    input[type='text'] {
        background-color: pink;
    }
    input[type='password'] {
        background-color: yellow;
    }
    font[size] {
        color: green
    }
    a[href] {
        color: blue;
    }
</style>
<a href="a.html">超链接</a>
<form name="login" action="#" method="get">
    <font size="3">用户名:</font>
    <input type="text" name="username" value="zhangsan"><br>
    <font size="3">密码:</font>
    <input type="password" name="password" value="123456"><br/>
    <input type="submit" value="登录">
</form>
3.5、伪类选择器
主要是针对a标签
语法:
- 静止状态 a:link
- 悬浮状态 a:hover
- 触发状态 a:active
- 完成状态 a:visited
<style>
    a {
        text-decoration: none;/*删除超链接的下划线*/
    }
    /* 原始状态 */
    a:link {
        color: yellow;
    }
    /* 点击之后的状态 */
    a:visited {
        color: red;
    }
    /* 鼠标悬停上去的状态 */
    a:hover {
        color: blue;
        border: 1px solid black;
    }
    /* 点击的状态 */
    a:active {
        color: black;
    }
</style>

<a href="https://www.sina.com.cn/">新浪</a>
a:hover必须在 CSS 定义中的a:link和a:visited之后,才能生效。a:active必须在 CSS 定义中的a:hover之后才能生效。
3.6 、后代选择器 重点
一个标签包含着另一个标签
<style>
    .pclass a {
        text-decoration: none;
        color: chocolate;
    }
</style>


<p class="pclass">
    <a href="https://www.sina.com.cn">新浪</a>
</p>
<a href="https://www.baidu.com">百度</a>
3.7、选择器分组 重点
可以将不同选择器放在同一组,统一设置样式
<style>
    #p1, a {
        color: red;
    }
</style>

<p id="p1">这是一个段落</p>
<a href="">这是一个超链接</a>
3.8、通用选择器 重点
选择页面上的所有的 HTML 元素
<style>
   	* {
        color: red;
    }
</style>
四、CSS属性
4.1、字体属性 重点
用于设置字体的属性,常见属性如下:
- font-size:设置文本的大小
- font-family:设置字体,宋体,楷体...
- font-style:指定斜体文本
- font-weight:字体粗细,100~900数值、normal、bold、bolder
<style>
    #p1 {
        font-size: 30px; /* 设置文本的大小 */
        font-family: "Courier New"; /* 设置字体 宋体 楷体 */
        font-style: italic; /* 用于指定斜体文本,  normal - 文字正常显示 italic - 文本以斜体显示 */
        font-weight: 100; /* 指定字体的粗细 normal bold  */
    }
</style>

<p id="p1">hello world</p>
为了缩短代码,也可以在一个属性中指定所有单个字体属性。
font 属性是以下属性的简写属性:
- font-style
- font-variant
- font-weight
- font-size
- font-family
font-size 和 font-family 的值是必需的。如果缺少其他值之一,则会使用其默认值。
<style>
    #p2 {
        font: italic bold 20px "Consolas";
    }
</style>

<p id="p2">hello world</p>
4.2、文本属性
用于对文本进行设置,常见属性如下:
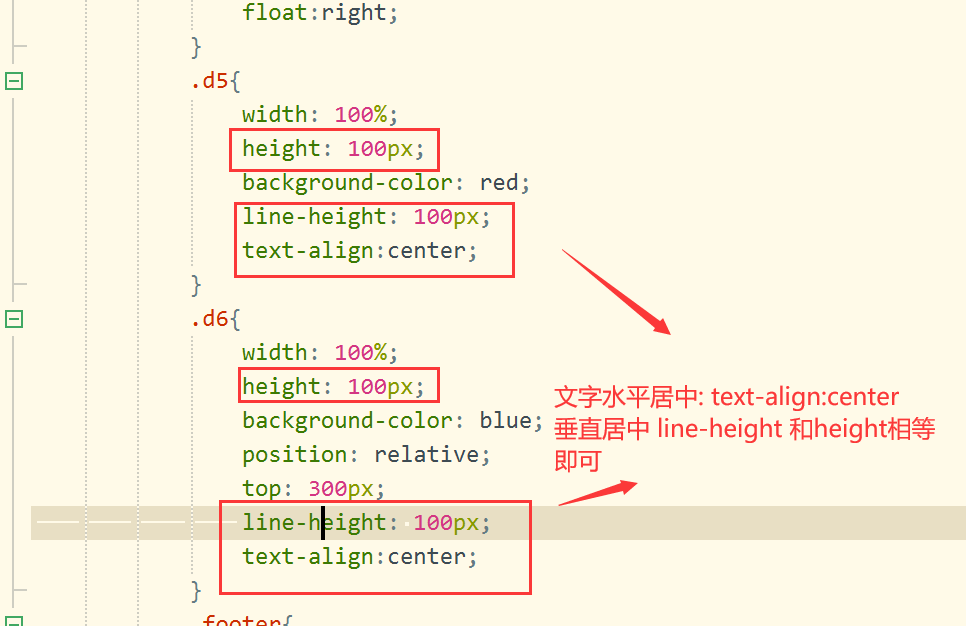
color:设置文本颜色,十六进制、表示颜色的英文单词;**  **重点**
text-indent:缩进元素中文本的首行,5px缩进5像素、20%缩进父容器宽度的百分之二十;
text-decoration:文本的装饰线
none:没有下划线
underline:下划线
overline:在句子上划线符号
line-through:删除线
text-align:文本水平对齐方式
left:左对齐
right:右对齐
center:居中
ord-spacing:单词之间的间隔
line-height:设置文本的行高
line-height和height 高度一致即可垂直居中
text-shadow:设置阴影及模糊效果,四个取值依次是: 水平偏移、垂直偏移、模糊值、阴影颜色
<style>
    #p1 {
        color: blue;
        text-decoration: underline;
        text-align: center;
        text-shadow: 20px 2px 2px red;
    }
</style>

<p id="p1">这是一个段落</p>
4.3、背景属性
用于对背景进行设置,常见属性如下:
- background-color:设置背景色,十六进制、表示颜色的英文单词; 重点
- background-image:设置背景图片,url('图片路径'); 重点
- **background-repeat:**设置背景图的平铺方向,repeat-y、repeat-x、repeat、no-repeat; 重点
- background-attachment:fixed; 重点
- background-size:规定背景图像的尺寸;
- background-position:改变图像在背景中的位置,top、bottom、left、right、center。
<style>
    body {
        background-color: red;
        background-image: url("./img/pic1.jpg");
        background-repeat: no-repeat;
        background-size: 100px 100px;
        background-attachment:fixed;   // scroll
        background-position: bottom center;
    }
</style>
4.4、列表属性
用于对列表进行设置,常见属性如下:
- list-style-type:改变列表的标识类型,none、disc(默认值)、circle、square、decimal(数字)、lower-latin(小写字母);
- list-style-image:用图像表示标识,url("图片地址"); 重点
- list-style-position:标识出现在列表项内容之外还是内部, inside、outside
<style>
#ul1 {
list-style-type: lower-latin;
}
#ul2 {
list-style-image: url("img/eg_arrow.gif");
}
#ul3 {
list-style-position: inside;
}
#ul4 {
list-style-position: outside;
}
</style>
<ul id="ul1">
<li>JavaSE</li>
<li>JavaWeb</li>
<li>SSM</li>
</ul>
<ul id="ul2">
<li>JavaSE</li>
<li>JavaWeb</li>
<li>SSM</li>
</ul>
<ul id="ul3">
<li>JavaSE</li>
<li>JavaWeb</li>
<li>SSM</li>
</ul>
<ul id="ul4">
<li>JavaSE</li>
<li>JavaWeb</li>
<li>SSM</li>
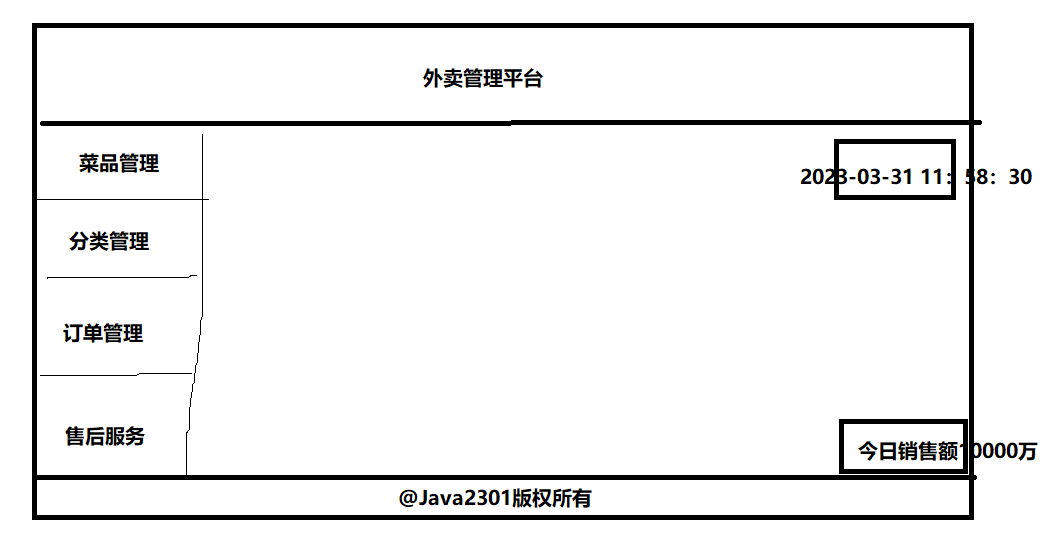
</ul>五、DIV+CSS布局 重点
5.1、HTML中元素的分类
HTML中根据元素显示状态分为块级(block)元素和内联(inline)元素。
- 块级(block)元素:块状元素独占一行,默认宽度为容器的100%
- p
- h1~h6
- table
- div(没有任何含义,可以将其当成一个盒子,用来包裹其他元素) 重点
- 内联(inline)元素:内联元素共处一行
- a 超链接
- img 图片
- input
- select 下拉列表
- span(没有任何含义,可以将其当成一个盒子,用来包裹其他元素) 重点
CSS中存在display属性,可以改变元素显示状态,display属性如下: 重点
- block:按块显示
- inline:同行显示
- none:隐藏
<style>
    #p1 {
        border: 1px solid blue;
        /* 将段落设置为内联元素 */
        display: inline;
    }

    #p2 {
        border: 1px solid red;
        /* 将段落设置为内联元素 */
        display: inline;
    }

    #a1 {
        border: 1px solid yellowgreen;
        /* 将超链接设置为块级元素 */
        display: block;
    }

    #a2 {
        border: 1px solid brown;
        /* 将超链接设置为块级元素 */
        display: block;
    }

    #p3 {
        /* 隐藏p3 */
        display: none;
    }
</style>

<body>
    <p id="p1">Java是最好的语言</p>
    <p id="p2">Java No.1</p>
    <a id="a1" href="https://www.baidu.com">百度</a>
    <a id="a2" href="https://www.sina.com.cn">新浪</a>
    <p id="p3">隐藏</p>
</body>
5.2、盒模型
5.2.1、盒模型简介
盒子模型
所有 HTML 元素都可以视为方框。在 CSS 中,在谈论设计和布局时,会使用术语“盒模型”或“框模型”。
CSS 框模型实质上是一个包围每个 HTML 元素的框。它包括:外边距、边框、内边距以及实际的内容。下图展示了框模型: padding: 1px 2px 3px 4px
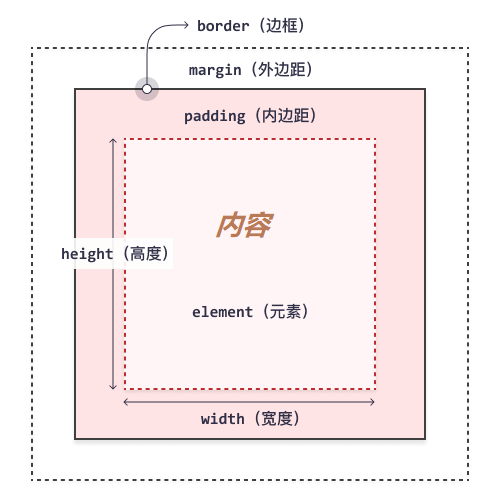
对不同部分的说明:
- 内容 - 框的内容,其中显示文本和图像;
- 内边距(padding) - 清除内容周围的区域。内边距是透明的;
- 边框(border) - 围绕内边距和内容的边框;
- 外边距(margin) - 清除边界外的区域。外边距是透明的;
- 宽度(width) - 内容区域的宽度;
- 高度(height) - 内容区域的高度
元素框的最内部分是实际的内容,直接包围内容的是内边距。
内边距呈现了元素的背景。内边距的边缘是边框。背景应用于由内容和内边距、边框组成的区域。
边框以外是外边距,外边距默认是透明的,因此不会遮挡其后的任何元素。
增加内边距、边框和外边距不会影响内容区域的尺寸,但是会增加元素框的总尺寸。
使用 CSS 设置元素的 width 和 height 属性时,只需设置内容区域的宽度和高度。要计算元素的完整大小,还必须把内边距、边框和外边距加起来。
5.2.2、与盒模型相关的CSS属性
5.2.2.1、宽度和高度
width:设置内容的宽度
height:设置内容的高度
5.2.2.2、边框
border:设置元素的边框
语法:
border: 宽度 样式 颜色border: 1px solid red 重点边框样式:
- none 无边框
- dotted 点状边框 .......
- dashed 虚线边框 -------
- solid 实线边框
border-radius:创建圆角
语法:
border-radius: 圆角半径
5.2.2.3、内边距 重点
padding:内容与边框之间的距离,其规则如下:
padding:
- 如果提供全部四个参数值,将按上、右、下、左的顺序作用于四边;
- 如果只提供一个,将用于全部的四边;
- 如果提供两个,第一个用于上、下,第二个用于左、右;
- 如果提供三个,第一个用于上,第二个用于左、右,第三个用于下。
除此之外,还有另外四个属性设置内边距:
- padding-top:设置元素的上内边距;重点
- padding-right:设置元素的右内边距;
- padding-bottom:设置元素的下内边距;
- padding-left:设置元素的左内边距。重点
5.2.2.4、外边距 重点
margin:边框与其他元素之间的距离,围绕在元素周围的空白区域,其规则如下:
- 如果提供全部四个参数值,将按上、右、下、左的顺序作用于四边;
- 如果只提供一个,将用于全部的四边;
- 如果提供两个,第一个用于上、下,第二个用于左、右;
- 如果提供三个,第一个用于上,第二个用于左、右,第三个用于下。
除此之外,还有另外四个属性设置外边距:
- margin-top:设置元素的上外边距;重点
- margin-right:设置元素的右外边距;
- margin-bottom:设置元素的下外边距;
- margin-left:设置元素的左外边距。重点
5.2.2.5、案例
<style>
    * {
        margin: 0px;
        padding: 0px;
    }

    #div1 {
        border: 1px solid blue;
        height: 50px;
        width: 200px;
        background-color: red;
        margin: 20px 20px;
        padding: 20px 20px;
        border-radius: 5px;
    }
</style>

<body>
    <div id="div1">hello world</div>
</body>
5.3、浮动属性float 重点
普通流定位:页面元素按照HTML元素默认的盒子模型,自上而下(block元素)或从左到右(inline元素)的排列次序。
浮动:浮动的框可以向左或向右移动,**直到它的外边缘碰到包含框或另一个浮动框的边框为止。**由于浮动框不在文档的普通流中,所以文档的普通流中的块框表现得就像浮动框不存在一样。
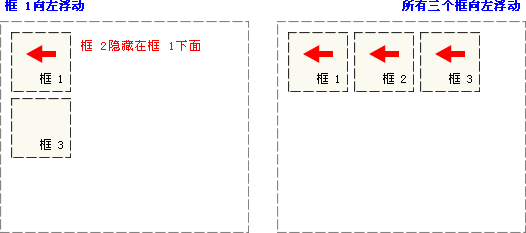
如下图所示,当把框 1 向右浮动时,它脱离文档流并且向右移动,直到它的右边缘碰到包含框的右边缘
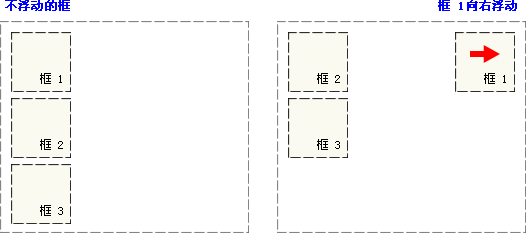
如下图所示,当框 1 向左浮动时,它脱离文档流并且向左移动,直到它的左边缘碰到包含框的左边缘。因为它不再处于文档流中,所以它不占据空间,实际上覆盖住了框 2,使框 2 从视图中消失。
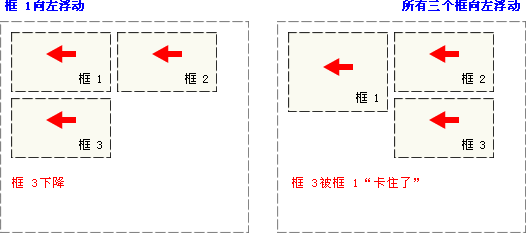
如果把所有三个框都向左移动,那么框 1 向左浮动直到碰到包含框,另外两个框向左浮动直到碰到前一个浮动框。
如下图所示,如果包含框太窄,无法容纳水平排列的三个浮动元素,那么其它浮动块向下移动,直到有足够的空间。如果浮动元素的高度不同,那么当它们向下移动时可能被其它浮动元素“卡住”。
<style>
    .dd{width:100px; height:100px;}
    .d1{ background-color: #f00;height:120px; float: left;}
    .d2{ background-color: #0f0; float: left;}
    .d3{ background-color: #00f; float: left;}
</style>
<body>
    <div style=" width:299px;">
        <div class="dd d1"></div>
        <div class="dd d2"></div>
        <div class="dd d3"></div>
    </div>
</body>
5.4、定位属性 重点 position (relative,absolute,fixed)
1不论是相对、绝对、固定,通过调整left top 以及 right bottom属性的取值,调整标签的位置
2固定和绝对定位,固定定位是不会随着滚动条滚动,绝对定位会滚动
相对定位(relative):元素框偏移某个距离,元素仍保持其未定位前的形状,它原本所占的空间仍保留。、
left 和 top **重点 **
<style type="text/css">
    h2.pos_left {
        position: relative;        //相对
        left: -20px

    }
    h2.pos_right {
        position: relative;
        left: 20px
    }
</style>

<body>
    <h2>这是位于正常位置的标题</h2>
	<h2 class="pos_left">这个标题相对于其正常位置向左移动</h2>
	<h2 class="pos_right">这个标题相对于其正常位置向右移动</h2>
	<p>相对定位会按照元素的原始位置对该元素进行移动。</p>
	<p>样式 "left:-20px" 从元素的原始左侧位置减去 20 像素。</p>
	<p>样式 "left:20px" 向元素的原始左侧位置增加 20 像素。</p>
</body>
绝对定位(absolute):元素框从文档流完全删除,并相对于其包含块进行定位。包含块可能是文档中的另一个元素或者是初始包含块。元素原先在正常文档流中所占的空间会关闭,就好像元素原来不存在一样。元素定位后生成一个块级框。
<style type="text/css">
    h2.pos_abs {
        position: absolute;
        left: 100px;
        top: 150px
    }
</style>

<body>
    <h2 class="pos_abs">这是带有绝对定位的标题</h2>
    <p>通过绝对定位,元素可以放置到页面上的任何位置。下面的标题距离页面左侧 100px,距离页面顶部 150px。</p>
</body>
固定定位(fixed):元素框的表现类似于将 position 设置为 absolute,不过其包含块是视窗本身。
 <style>
    #left {
        width: 200px;
        height: 200px;
        background-color: red;
        position: fixed;
        left: 0px;
        bottom: 0px;
     }
     #right {
         width: 200px;
         height: 200px;
         background-color: green;
         position: fixed;
         right: 0px;
         bottom: 0px;
     }
     #middle{
         width: 200px;
         height: 200px;
         background-color: blue;
         position: fixed;
         left: 50%;
         bottom: 50%;
     }
</style>

<body>
	<div id="left">左下</div>
    <div id="right">右下</div>
    <div id="middle">中间</div>
</body>
5.5、注册案例
<!DOCTYPE html>
<html lang="en">
<head>
    <meta charset="UTF-8">
    <title>注册</title>
    <style>
        * {
            margin: 0px;
            padding: 0px;
            box-sizing: border-box;
        }

        body {
            background-image: url("./img/bg.jpeg");
            background-repeat: no-repeat;
            background-attachment:fixed;
            background-position: top center;
            padding-top: 25px;
        }

        .rg_layout {
            width: 900px;
            height: 500px;
            border: 6px solid darkgray;
            margin: auto;
            background-color: honeydew;
        }

        .rg_left {
            margin: 20px;
            /*border: 1px solid black;*/
            float: left;
        }

        .rg_left p:first-child {
            font-size: 20px;
            color: yellowgreen;
        }

        .rg_left p:last-child {
            font-size: 20px;
            color: lightslategray;
        }

        .rg_center {
            /*border: 1px solid black;*/
            float: left;
        }

        .rg_right {
            margin: 20px;
            /*border: 1px solid black;*/
            float: right;
        }

        .rg_right p a {
            color: lightslategray;
        }

        .td_left {
            width: 100px;
            text-align: right;
            height: 45px;
        }

        .td_right {
            padding-left: 50px;
        }

        #username, #password, #email, #name, #birthday, #tel, #code {
            width: 251px;
            height: 32px;
            border: 1px solid darkgray;
            border-radius: 5px;
            padding-left: 10px;
        }

        #code {
            width: 150px;
        }

        #img_code {
            height: 32px;
            vertical-align: middle;
        }

        #reg_btn {
            width: 150px;
            height: 40px;
            background-color: #0000FF;
        }
    </style>
</head>
<body>
    <div class="rg_layout">
        <div class="rg_left">
            <p>新用户注册</p>
            <p>USER REGISTER</p>
        </div>
        <div class="rg_center">
            <div class="rg_form">
                <form action="#" method="post">
                    <table>
                        <tr>
                            <td class="td_left"><label for="username">用户名</label></td>
                            <td class="td_right"><input type="text" name="username" id="username" placeholder="请输入用户名"></td>
                        </tr>
                        <tr>
                            <td class="td_left"><label for="password">密码</label></td>
                            <td class="td_right"><input type="password" name="password" id="password"></td>
                        </tr>
                        <tr>
                            <td class="td_left"><label for="email">电子邮箱</label></td>
                            <td class="td_right"><input type="email" name="email" id="email"></td>
                        </tr>
                        <tr>
                            <td class="td_left"><label for="name">姓名</label></td>
                            <td class="td_right"><input type="text" name="name" id="name"></td>
                        </tr>
                        <tr>
                            <td class="td_left"><label for="tel">手机号</label></td>
                            <td class="td_right"><input type="text" name="tel" id="tel"></td>
                        </tr>
                        <tr>
                            <td class="td_left"><label>性别</label></td>
                            <td class="td_right">
                                <input type="radio" name="gender">男
                                <input type="radio" name="gender">女
                            </td>
                        </tr>
                        <tr>
                            <td class="td_left"><label for="birthday">出生年月</label></td>
                            <td class="td_right"><input type="date" name="birthday" id="birthday"></td>
                        </tr>
                        <tr>
                            <td class="td_left"><label for="code">验证码</label></td>
                            <td class="td_right"><input type="text" name="code" id="code"><img id="img_code" src="./img/验证码.jpg"></td>
                        </tr>
                        <tr>
                            <td align="center" colspan="2"><button id="reg_btn" type="submit">注册</button></td>
                        </tr>
                    </table>
                </form>
            </div>
        </div>
        <div class="rg_right">
            <p>已有帐号?<a href="#">立即注册</a></p>
        </div>
    </div>
</body>
</html> 补充案例: