SpringBoot进阶
SpringBoot进阶
1springboot整合jsp
(1)导入tomcat-embed-jasper依赖
(2)打包方式war,main下新建webapp目录,jsp文件放在这个目录下
(3)全局配置文件中配置前缀和后缀
2springboot整合ssm[本质上就是整合mybatis]
(1)导入mybatis-spring-boot-starter依赖 (2.2.2)、数据源、驱动
(2)全局配置文件中配置数据库连接、别名、mapper层日志等级
(3)代码编写同ssm中一样了
补充:springboot整合spring security [如果用到了ss的标签,需要另外导]类似于ssm整合spring security
@Mapper
@MapperScan
环境切换: spring.profiles.active=dev
thymeleaf模板引擎:
(1)先导入依赖 (打包war)
(2)页面放到templates中,引入thymeleaf的命名空间
(3)常用语法: th:text 取数据 @{/}返回当前项目访问名称 th:each 循环 th:if 流程控制
热启 : devtools
一、SpringBoot整合JSP
SpringBoot应用默认支持的动态网页技术是Thymeleaf,同时也支持JSP;因此在SpringBoot应用想要使用JSP需要通过手动整合来实现
1.1、添加依赖
<dependency>
    <groupId>org.apache.tomcat.embed</groupId>
    <artifactId>tomcat-embed-jasper</artifactId>
    <version>9.0.45</version>
</dependency>
<!--按需导-->
<dependency>
    <groupId>javax.servlet</groupId>
    <artifactId>jstl</artifactId>
    <version>1.2</version>
</dependency>
1.2、创建JSP页面
修改pom文件打包方式为war; (通常来说,springboot适用于前后端分离模式下的开发情景,)
在
src/main下新建webapp目录;在webapp创建.jsp页面。
1.3、将JSP页面放在webapp中的访问
将JSP文件存放到
webapp目录;在
application.yml文件配置SpringMVC视图解析方式:
spring:
  mvc:
    view:
      prefix: /
      suffix: .jsp
创建
TestController
@Controller
public class TestController {

    @RequestMapping("/test")
    public String test() {
        return "test";
    }
}
如果使用静态资源,静态资源需要放在
resource/static目录下。
二、基于SpringBoot的SSM整合(重点)
student 表
(id ,name ,a)
2.1、创建Springboot项目
创建项目时添加依赖
- lombok
- spring web
- mysql driver ,druid数据源
- mybatis framework
- PageHelper
修改mysql驱动的版本(可选)
<dependencies>
    <dependency>
        <groupId>org.springframework.boot</groupId>
        <artifactId>spring-boot-starter-web</artifactId>
    </dependency>
    <dependency>
        <groupId>org.projectlombok</groupId>
        <artifactId>lombok</artifactId>
        <optional>true</optional>
    </dependency>
    <dependency>
        <groupId>org.springframework.boot</groupId>
        <artifactId>spring-boot-starter-test</artifactId>
        <scope>test</scope>
    </dependency>
    <dependency>
        <groupId>org.apache.tomcat.embed</groupId>
        <artifactId>tomcat-embed-jasper</artifactId>
        <version>9.0.45</version>
    </dependency>
    <dependency>
        <groupId>javax.servlet</groupId>
        <artifactId>jstl</artifactId>
        <version>1.2</version>
    </dependency>
    <dependency>
        <groupId>mysql</groupId>
        <artifactId>mysql-connector-java</artifactId>
        <version>5.1.49</version>
        <scope>runtime</scope>
    </dependency>
    <dependency>
        <groupId>com.alibaba</groupId>
        <artifactId>druid-spring-boot-starter</artifactId>
        <version>1.2.8</version>
    </dependency>
    <dependency>
        <groupId>org.mybatis.spring.boot</groupId>
        <artifactId>mybatis-spring-boot-starter</artifactId>
        <version>2.2.2</version>   版本不要乱写,容易出会话工厂的问题
    </dependency>
    <dependency>
        <groupId>com.github.pagehelper</groupId>
        <artifactId>pagehelper-spring-boot-starter</artifactId>
        <version>1.4.1</version>
    </dependency>
2.2、整合MyBatis所需的配置
完成MyBatis的自定义配置
server.port=8099
server.servlet.context-path=/test

# 配置前缀后缀
spring.mvc.view.prefix=/
spring.mvc.view.suffix=.jsp

# 配置连接池
spring.datasource.driver-class-name=com.mysql.jdbc.Driver
spring.datasource.url=jdbc:mysql://localhost:3306/ssm_demo?useSSL=false
spring.datasource.username=root
spring.datasource.password=root

# mybatis配置
mybatis.type-aliases-package=com.qfedu.bean
# mybatis.mapper-locations=classpath:mapper/*Mapper.xml

# 日志   打印sql语句
logging.level.com.qfedu.mapper=DEBUG
2.3、创建实体类
Student.java
@Data
public class Student {
    private Long id;
    private String name;
    private String gender;
    private Integer age;
    private String addr;
}
2.4、创建Mapper接口及映射配置文件
StudentMapper.java
public interface StudentMapper {
    //添加
    int add(Student student);
    //根据ID删除
    int del(Long id);
    //修改
    int update(Student student);
    //查询所有
    List<Student> findAll();
    //根据ID查询
    Student findById(Long id);
}
StudentMapper.xml
<?xml version="1.0" encoding="UTF-8" ?>
<!DOCTYPE mapper PUBLIC "-//mybatis.org//DTD Mapper 3.0//EN" "http://mybatis.org/dtd/mybatis-3-mapper.dtd" >
<mapper namespace="com.qfedu.mapper.StudentMapper">
    <insert id="add" parameterType="student">
        INSERT INTO `student`(`name`, `gender`, `age`, `addr`)
        VALUES (#{name}, #{gender}, #{age}, #{addr})
    </insert>
    <update id="update" parameterType="student">
        UPDATE `student` SET `name`=#{name},
        `gender`=#{gender}, `age`=#{age}, `addr`=#{addr} WHERE `id`=#{id}
    </update>
    <delete id="del" parameterType="long">
        delete from `student` where `id`=#{id}
    </delete>
    <select id="findAll" resultType="student">
        select * from `student`
    </select>
    <select id="findById" resultType="student">
        select * from `student` where `id`=#{id}
    </select>
</mapper>
2.5、在启动类配置Mapper扫描
@MapperScan
@SpringBootApplication
@MapperScan("com.qfedu.mapper")
public class Application {
    public static void main(String[] args) {
        SpringApplication.run(SpringbootSsmApplication.class, args);
    }
}
2.6、在测试类中测试
package com.qfedu;

import com.qfedu.entity.User;
import com.qfedu.mapper.UserMapper;
import org.junit.jupiter.api.Test;
import org.springframework.beans.factory.annotation.Autowired;
import org.springframework.boot.test.context.SpringBootTest;

import java.util.List;

@SpringBootTest
public class ApplicationTests {
    @Autowired
    private StudentMapper studentMapper;

    @Test
    public void test1() {
        studentMapper.findAll().stream().forEach(System.out::println);
    }
}
2.8、完成学生管理系统SpringBoot版
将之前学生管理系统,相关文件拷贝到项目中,测试。
补充:druid并非是必须导入** :可以在Mapper接口中用@Mapper标记,就不用在启动类@MapperScan**
三、Thymeleaf
Thymeleaf是一种类似于JSP的动态网页技术 jsp thymeleaf
动态web技术
模板引擎:JSP、Thymeleaf、Freemarker...【前后端不分离】
3.1、Thymeleaf简介
JSP 必须依赖Tomcat运行,不能直接运行在浏览器中
HTML可以直接运行在浏览器中,但是不能接收控制器传递的数据
Thymeleaf是一种既保留了HTML的后缀能够直接在浏览器运行的能力、又实现了JSP显示动态数据的功能——静能查看页面效果、动则可以显示数据
3.2、Thymeleaf的使用
SpringBoot应用对Thymeleaf提供了良好的支持
3.2.1、添加thymeleaf的starter
<dependency>
    <groupId>org.springframework.boot</groupId>
    <artifactId>spring-boot-starter-thymeleaf</artifactId>
</dependency>
3.2.2、创建Thymeleaf模板
Thymeleaf模板就是HTML文件;
SpringBoot应用中
resources\templates目录就是用来存放页面模板的重要说明:
static目录下的资源被定义静态资源,SpringBoot应用默认放行,如果将HTML页面创建static目录是可以直接访问的
templates 目录下的文件会被定义为动态网页模板,SpringBoot应用会拦截templates中定义的资源;如果将HTML文件定义在templates目录,则必须通过控制器跳转访问。
在templates创建HTML页面模板
创建PageController,用于转发允许"直接访问"的页面请求
@Controller
@RequestMapping("/page")
public class PageController {

    @RequestMapping("/index")
    public String index(){
        return "index";
    }

}
3.3、Thymeleaf基本语法 ---->代替jsp
如果要在thymeleaf模板中获取从控制传递的数据,需要使用th标签
3.3.1、在thymeleaf模板页面引入th标签的命名空间
<!DOCTYPE html>
<html lang="en" xmlns:th="http://www.thymeleaf.org">
    <head>
        <meta charset="UTF-8">
        <title>Title</title>
    </head>
    <body>
		<p>这是thymeleaf页面</p>
    </body>
</html>3.3.2、th:text
类似于el表达式
在几乎所有的HTML双标签都可以使用
th:text属性,将接收到的数据显示在标签的内容中;标准变量表达式用于访问容器上下文环境中的变量,功能和
EL中的${}相同。Thymeleaf中的变量表达式使用${变量名}的方式获取Controller中model其中的数据。el是jsp中的技术!
<label th:text="${price}"></label>
<div th:text="${str}"></div>
<p th:text="${user.username}"></p>3.3.3、th:object 和 *
选择变量表达式,也叫星号变量表达式,使用
th:object属性来绑定对象。选择表达式首先使用
th:object来绑定后台传来的 User对象,然后使用*来代表这个对象,后面{}中的值是此对象中的属性。 选择变量表达式*{...}是另一种类似于标准变量表达式${...}表示变量的方法,选择变量表达式在执行时是在选择的对象上求解,而${...}是在上下文的变量 Model 上求解,这种写法比标准变量表达式繁琐,只需要大家了解即可。
<div th:object="${user}">
    <p th:text="*{id}"></p>
    <p th:text="*{username}"></p>
    <p th:text="*{addr}"></p>
</div>3.3.4、@{...}
类似于jsp中 $
主要用于链接、地址的展示,可用于:\
<script src="...">;<link href="...">;<a href="...">;<form action="...">;<img src="">.可以在 URL 路径中动态获取数据。
配置项目的上下文路径:
server.servlet.context-path=/statics使用路径表达式:
<script th:src="@{/test.js}"></script>
<link rel="stylesheet" th:href="@{/test.css}"/>

<p>
    <a th:href="@{/hello/test}">test</a>
</p>

<!-- 传递参数 -->
<p>
    <a th:href="@{/hello/test1(id=1, username='zs')}">test</a>


</p>
3.4、流程控制
3.4.1、th:each循环
<table style="width: 600px" border="1" cellspacing="0">
    <caption>图书信息列表</caption>
    <thead>
        <tr>
            <th>id</th>
            <th>name</th>
            <th>addr</th>
        </tr>
    </thead>
    <tbody>
        <tr th:each="user:${userList}">
            <td th:text="${user.id}"></td>
            <td th:text="${user.username}"></td>
            <td th:text="${user.addr}"></td>
        </tr>
    </tbody>
</table>
3.4.2、分支
th:if如果条件不成立,则不显示此标签
<td th:if="${b.bookPrice}>40" style="color:red">太贵!!!</td>
<td th:unless="${b.bookPrice}>40" style="color:red">太贵!!!</td>

<td th:if="${b.bookPrice}<=40" style="color:green">推荐购买</td>
th:switch和th:case
<td th:switch="${b.bookPrice}/10">
    <label th:case="3">建议购买</label>
    <label th:case="4">价格合理</label>
    <label th:case="*">价格不合理</label>
</td><td th:switch="${user.gender}">
<label th:case="M">男</label>
<label th:case="F">女</label>
<label th:case="*">性别不详</label>
</td>切换: spring.profiles.active=sit
3.5、碎片使用
3.5.1、碎片的概念
碎片,就是HTML片段,我们可以将多个页面中使用的相同的HTML标签部分单独定义,然后通过th:include可以在HTML网页中引入定义的碎片
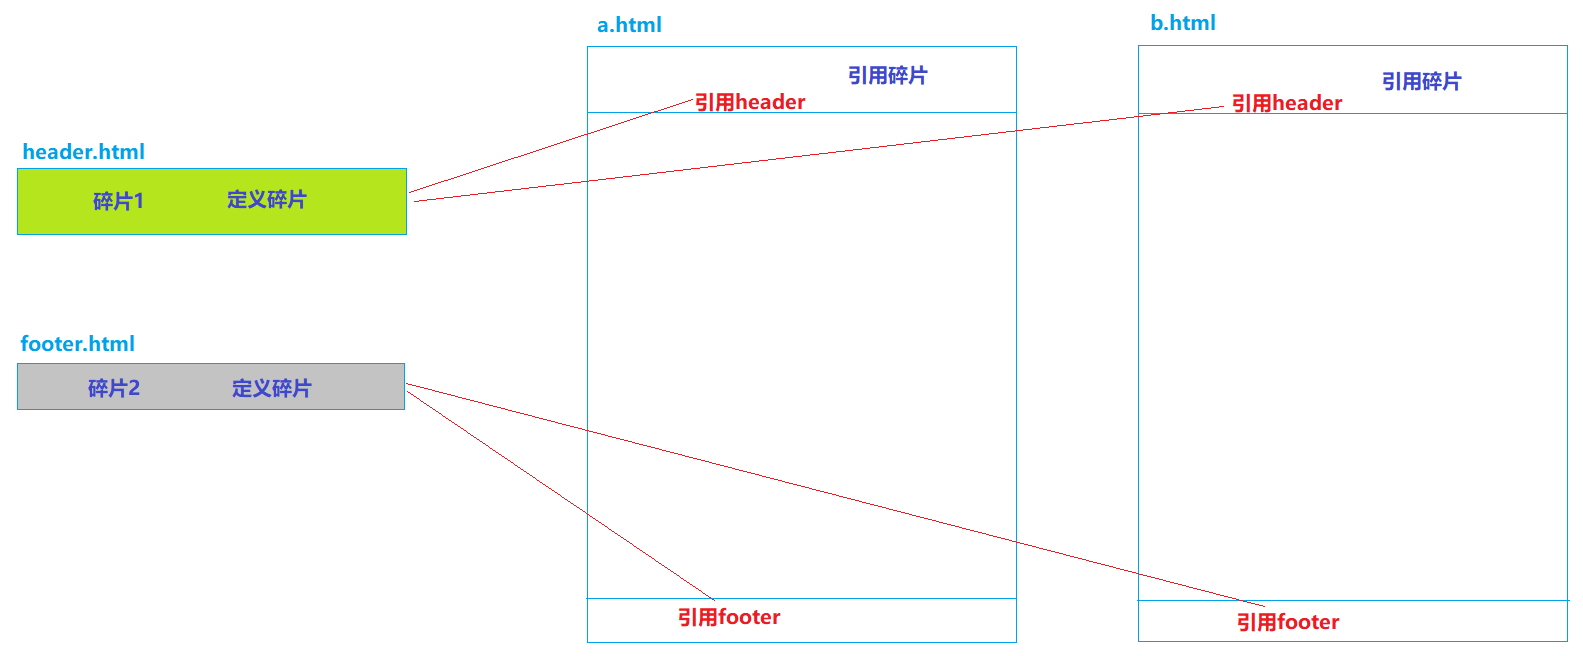
3.5.2、碎片使用案例
定义碎片 th:fragment
header.html
<!DOCTYPE html>
<html lang="en" xmlns:th="http://www.thymeleaf.org">
<head>
    <meta charset="UTF-8">
    <title>Title</title>
</head>
<body>

<div th:fragment="fragment1" style="width: 100%; height: 80px;background: deepskyblue; color:white; font-size: 25px; font-family:文鼎霹雳体">
    千锋,六六六!!!
</div>

</body>
</html>
footer.html
<!DOCTYPE html>
<html lang="en"  xmlns:th="http://www.thymeleaf.org">
<head>
    <meta charset="UTF-8">
    <title>Title</title>
</head>
<body>

<div th:fragment="fragment2" style="width: 100%; height: 30px;background: lightgray; color:white; font-size: 16px;">
    千锋教育
</div>

</body>
</html>
引用碎片 th:include 和 th:replace
a.html
<!DOCTYPE html>
<html lang="en" xmlns:th="http://www.thymeleaf.org">
<head>
<meta charset="UTF-8">
<title>Title</title>
</head>
<body>
<!-- <div th:include="header::fragment1"></div>-->
<div th:replace="header::fragment1"></div>
<div style="width: 100%; height: 500px">
定义内容
</div>
<!-- <div th:include="footer::fragment2"></div>-->
<div th:replace="footer::fragment2"></div>
</body>
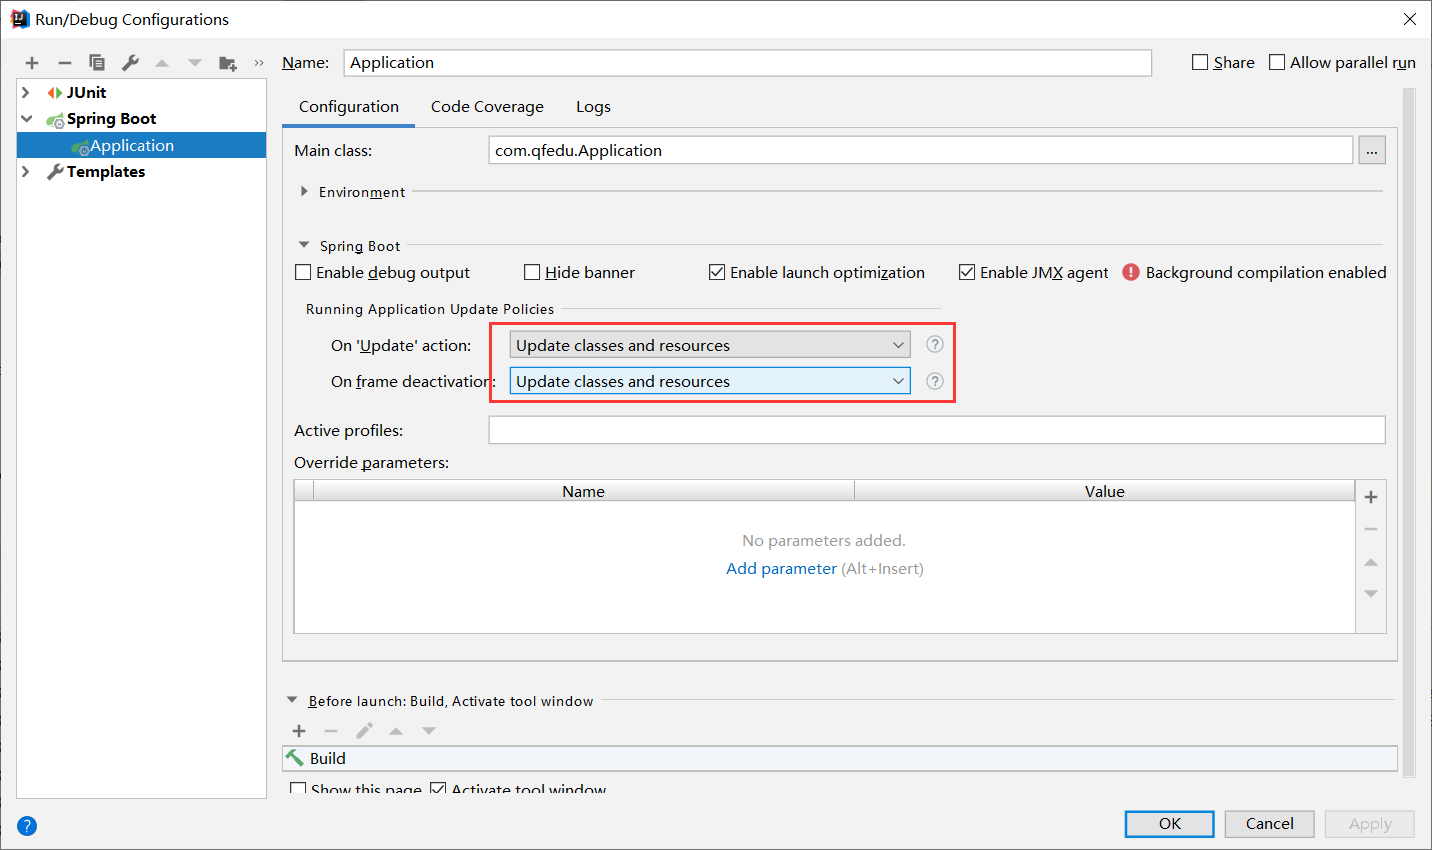
</html>四、SpringBoot应用的热部署配置
"热" --- 不用停掉现有操作就可以进行“修改”的一种技术。
USB --- 热插拔
PS2 --- 不支持热插拔
4.1、热部署
项目首次部署、服务启动之后,如果应用发生了变化、而且IDEA感知到了应用的变化,就自动的完成jar的更新,无需手动再次启动服务器,就可以访问应用的更新。
目的:提高效率
4.2、热部署配置
热部署: devtools jrebel
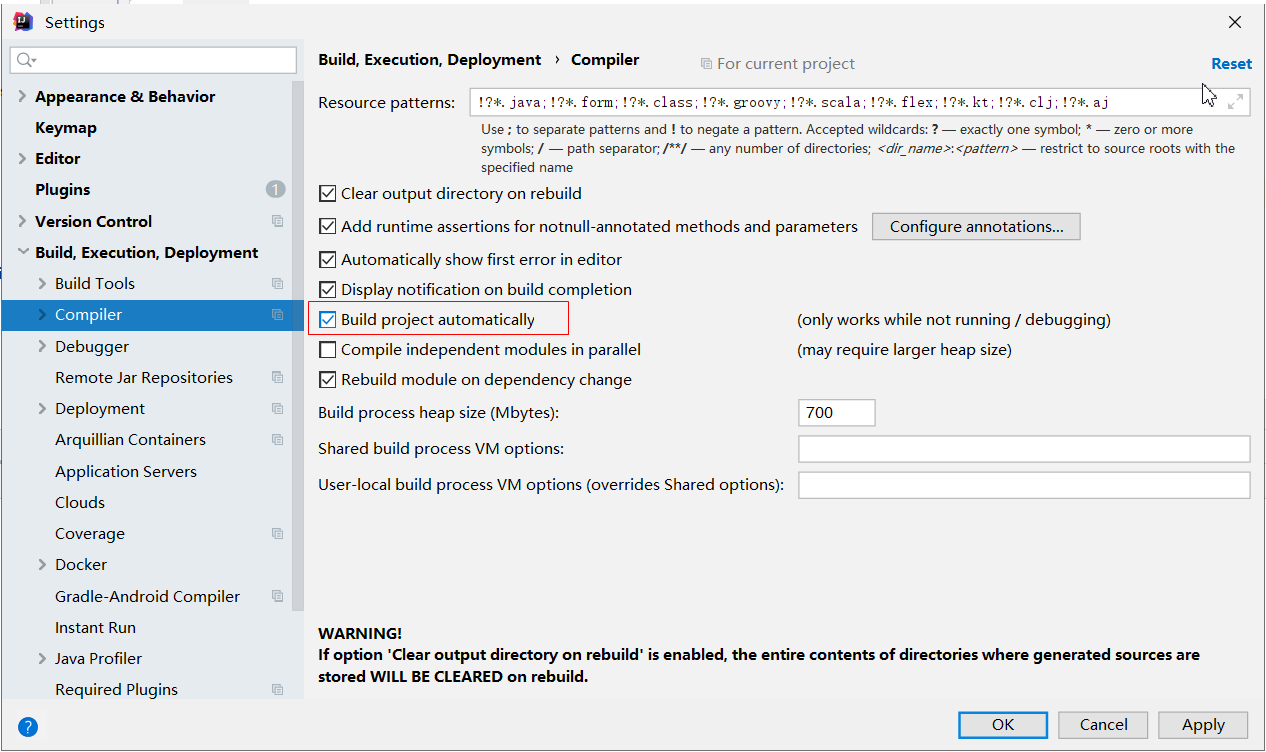
4.2 .1、IDEA配置
File---settings
4.2.2、SpringBoot项目配置
在需要进行热部署的SpringBoot应用中添加依赖
<dependency>
    <groupId>org.springframework.boot</groupId>
    <artifactId>spring-boot-devtools</artifactId>
</dependency>
配置SpringBoot应用的变化更新策略